
In this comprehensive guide, we will walk you through the step-by-step process of setting up your account and optimizing your workflow within AgentSync Contracting. Whether you're a new user, or you're looking to enhance your existing setup, this guide will provide you with the necessary information and instructions to navigate the platform effectively.
Here's an interactive tutorial
** Best experienced in Full Screen (click the icon in the top right corner before you begin) **
Table of Contents
- Account Registration: Creating your AgentSync Contracting account and getting started
- Organization Management: Managing organizations and reviewing invitations for collaboration.
- Completing your Contracts: Understanding the process of contract review, submission, and tracking.
- Finish Profile Setup: Personalizing your profile, adding important details, and configuring preferences.
- Notifications & Reminders: Staying informed about important updates and tasks.
- Support & Resources: Accessing help resources and reaching out to our support team.
Account Registration: Creating your AgentSync Contracting Account and Getting Started
To access AgentSync Contracting, you will need an invitation from an organization through a self-registration link or email.
- Invitation Received: You will receive an email invitation with the subject line, "Welcome to Okta!" from the sender: Okta.
- Review the Invitation: Click on the blue button labeled Activate Okta Account to begin setting up your AgentSync Contracting Profile. The link will only be valid for 7 days. The invitation will look like this:

Additional details on setting up your account can be found in the article: Creating your Producer Profile Account.
Organization Management: Managing organizations and reviewing invitations for collaboration.
Nice! You have successfully logged in to AgentSync Contracting. it's time to accept the organization before receiving your carrier contracts.
- Accept the Invitation: Accept the invitation to start contracting with the organization. It will say, "You've been invited to join [Organization name]" This will now connect you to the organization and display any contracts that require action.

- Review and Submit: Review and submit your first contract under the 'Requires Action' tab. It will say, "Contract between [your name] and [organization name]" and will include the writing number below. Click the button 'REVIEW AND SUBMIT"

Completing your Contracts: Understanding the process of contract review, submission, and tracking.
Now that you have accepted the organization and are ready to review and submit your contracts, follow the step-by-step instructions below:
-
Access Carrier Contracts: When you first log into Contracting, you will be brought to your Producer Profile page. All contracts live on your Contracting Dashboard, so you'll need to navigate there. To do so, click your name in the top left corner of the screen and click Contracting Dashboard ->. Once in the Dashboard, you can find all contracts requiring action, new contracts, and current & past contracts.


-
Review and Compolete Contracts: Review the list of available carrier packets in the "Contracts requiring action" and "Fill out a new contract" tabs and select the contracts you wish to complete.
- Contracts Requiring Action: Click Review to confirm and/or complete an individual contact.

- Fill Out a New Contract: Select the checkbox(es) next to the contract(s) you wish to complete. You may select multiple contracts at one time if you wish. Then, click REVIEW AND SUBMIT.

- Contracts Requiring Action: Click Review to confirm and/or complete an individual contact.
-
Personal Information: In this step, you will begin setting up your 'Producer Profile.' Ensure that all your information is complete and accurate. Any fields you complete or edit will be saved to your Producer Profile, saving you time for future contracts.
-
Answer Legal Questions: You will be presented with a series of personal and legal questions required by the organization. Provide accurate and honest answers to complete this section.
-
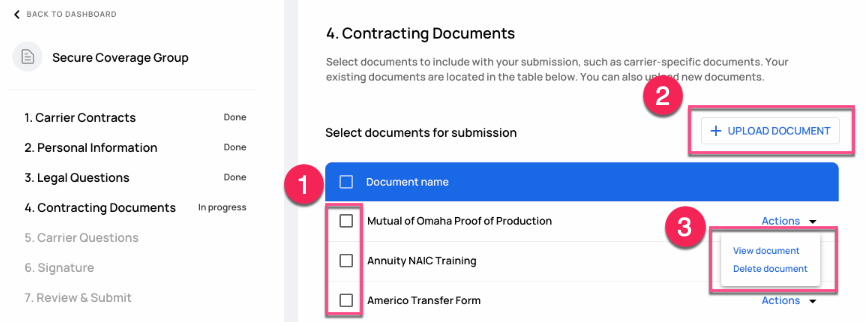
Upload Contracting Documents: (1) Select any necessary documents to include with your contract submission. This may include carrier-specific documents. (2) Use the '+UPLOAD DOCUMENT' button to upload the required files. (3) You also have the option to view and delete the document after uploading if needed.
-
Complete Carrier Questions: Proceed to answer a series of questions specific to the carrier. Provide the required information as accurately as possible.
-
Sign the Contract: At this stage, your signature will be required. Follow the instructions to sign the contract electronically.
-
Review and Submit: Take the opportunity to review the entire document before submitting. Ensure that all the information is accurate and meets your satisfaction. Once you are satisfied, submit the contract. It will then be sent back to the organization for review and subsequently forwarded to the respective carrier.
Additional details on managing your contracts can be found in the article Managing Pending Contracts & Tasks.
Finish Profile Setup: Personalizing your profile, adding important details, and configuring preferences.
After returning to your dashboard, you'll want to finish setting up your profile. You added some information during the steps above, which saved for you, but you'll want to go in and make sure everything looks correct to speed up the process for future carrier contract submissions.
- Go to Profile: On your dashboard, you'll see your name and email address in the top left corner. Click on the carrot button and click Go to Profile ->.

- Welcome to your Profile! Before updating your personal information, you can review our security information:
- Review & Update your Profile: Select the pencil on the right of personal details to begin updating.

- Personal Details: Name, DOB, Gender, SSN, Marital status, U.S. citizenship, email, phone number, residential address, business address, and mailing address.
- NIPR Licenses: when you were set up by the organization, your NPN was entered so your licenses are pulling through directly from NIPR. If you aren't seeing the correct licenses, make sure to 'verify your NPN'
- Driver's License: DL number, DL state, issue date, and expiry date.
- FINRA: CRD Number
- Payment Details: Account nickname, bank name, account type, account holder name, account number, and routing number.
- Insurance: Errors & Omissions (E&O)
- Training & Certificates: Course name, category (AML, state, carrier), completion date.
Notifications and Reminders: Staying informed about important updates and tasks.
Congratulations! You have successfully submitted your first contract, and your personal producer profile is now up-to-date. Whenever there are new updates or tasks requiring your attention, you will receive notifications at the 'primary email' address you provided in your profile details.
Support and Resources: Accessing help resources and reaching out to our support team.
Make sure to explore our help center for additional articles, including a page dedicated to bug fixes and a comprehensive glossary. If you encounter any issues or need assistance, our team is here to help! Feel free to reach out to us at contractingsupport@agentsync.io. We're always ready to assist you.