
If you are to looking expedite some of your daily tasks in Manage, like Onboarding Producers, Appointing Producers, Terminating Appointments, Adding Producer Assignments or Inviting Agents to the Portal, this article is for you!
Many of the actions you take in AgentSync Manage can be done in bulk! This article walks through all of our bulk processes to help save you even more time.
Click on the link to jump to the desired section:
- Bulk Onboard Producers
- Bulk Onboard Producers with Producer Assignments
- Bulk Appoint Utility in Manage
- Bulk Appoint Eligibility Reasons Dictionary
- Bulk Terminate Appointments
- Bulk Invite Agents to the Portal
AgentSync Tip: AgentSync also has the ability to make mass updates on your records & send mass emails through list views. Check out our course in AgentSync Academy using one of these access codes: agentsyncforagencies, agentsyncforcarriers, or agentsyncformgas.
Bulk Onboard Producers
Onboarding producers one-by-one is great, until you have a new hiring class. This section walks you through how to upload your producers in bulk.
Step 1: Navigate to the AgentSync CSV Import object in Manage
AgentSync Tip: Not seeing the tab? Try clicking the 9-dot box in the top left corner of the page and searching there!
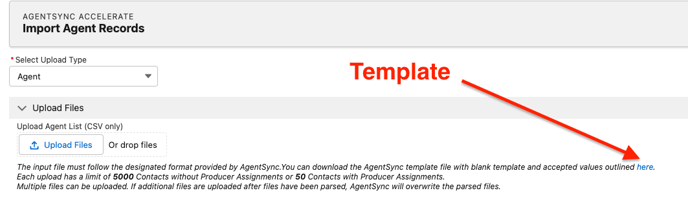
Step 2: From the Select an Upload type dropdown, select Agent
Step 3: Click the blue here link in the description to download the CSV template that must be used for the upload
Step 4: Add the following information for each of your producers:
- Agency NPN
- First Name
- Last Name
- Agent NPN
- Agent Email (optional)
- Agent SSN (optional)
AgentSync Tip: Does your agency record not have an NPN? Simply input a dummy NPN onto your account record and on the agency NPN line.
AgentSync Tip: The other fields such as email, Line of Authority, states, scorecard type, and agent type are optional. Some of these fields are used when creating Producer Assignments during the upload. Interested in adding Producer Assignments to your bulk upload? Click here to jump to the instructions!
Step 5: After all the data is entered into the template, save the document as a CSV file
Step 6: Navigate back to the AgentSync CSV Import tab in Manage
Step 7: Click the Upload Files button and upload the CSV file you just saved
Step 8: Click Parse 1 File
AgentSync Tip: You may see a page that looks scary saying that your document has tons of errors. It is likely because the uploader is reading the blank rows. If the errors are related to blank rows, simply minimize the rows with errors screen.
Step 9: Click Process Rows to upload agents
You did it! Now that your agents are added, they are synced with NIPR and you will receive daily updates for these producers.
Watch a video of this process here!
Bulk Onboard Producers with Producer Assignments
Want to bulk upload your producers with their producer assignments? This section will show you how!
This section assumes that you are able to use our bulk upload feature. Need a refresher? Click here to jump to the Bulk Onboard Producers section!
Step 1: Follow steps 1-4 of the Bulk Onboard Producers section.
Step 2: To create a producer assignment, you must also add the following fields:
- LOA category
- States
- Scorecard Type
- Agent Type
- CoCode(s) (for carrier customers who are creating license & appointment scorecards)
AgentSync Warning: Values must be separated by a semi-colon and zero spaces. They must be submitted based on the accepted values listed in the second tab of the spreadsheet titled "accepted_values".
Step 3: Follow steps 5-9 of the Bulk Onboard Producers section.
View a video walkthrough of this process here!
Bulk Appoint Utility in Manage
The Bulk Appoint Utility in Manage allows for users to submit appointments for multiple producers at one time through Manage! This highly requested feature is a huge time saver for customers who need to submit appointments for multiple producers at one time. Here is a quick video on how bulk appointment utility works!
The Bulk Appoint Utility is a complex feature that may not be right for everyone. If you are interested in using the Bulk Appoint Utility, please reach out to your Customer Success Manager to determine it is a good fit for you!
Looking for the Eligibility Reason dictionary? Click here to jump to that section!
The 5 Things You Need to Know about Bulk Appointments in AgentSync Manage
1. Users have two options for utilizing the AgentSync Bulk Appointment Feature:-
- Auto-submit or queue up appointments through an integration with AgentSync Manage
- Partner with AgentSync’s Customer Solutions Engineering (CSE) team to create a flow that allows for submission of multiple appointments through a bulk data load. In order to take advantage of this functionality, please reach out to your CSM to learn if you are the right fit.
AgentSync Note: If you are auto-submitting appointments through your own integrations, it's critical to run safety checks when the auto-appoint functionality is updated. Please work with your Customer Success Manager to ensure this is done.
-
- The system will first confirm that the producer’s NPN exists, synced correctly, and is active in AgentSync. Once those three criteria are met, the system will then create the appointment transaction.
- During your implementation, you likely configured your gateway business rules, which are the lines of authorities and class codes that you do business in. When you select a specific LOA category, you submit transactions for the active lines within that category. In the latest version of the bulk appointing utility, transactions are created for all active lines within the requested LOA category (whether the producer is eligible or not).
However, only the eligible appointments will be submitted within that category, so do not be alarmed by the number of transactions! AgentSync put this process in place to ensure that your producers are appointed for all required lines. You can either leave the transactions as is or close them individually or in bulk through a list view.
Here is a brief example from the video (linked in the “New Version” section in this doc). Below, we can see the Apex code requesting an appointment submission for life and health in California.
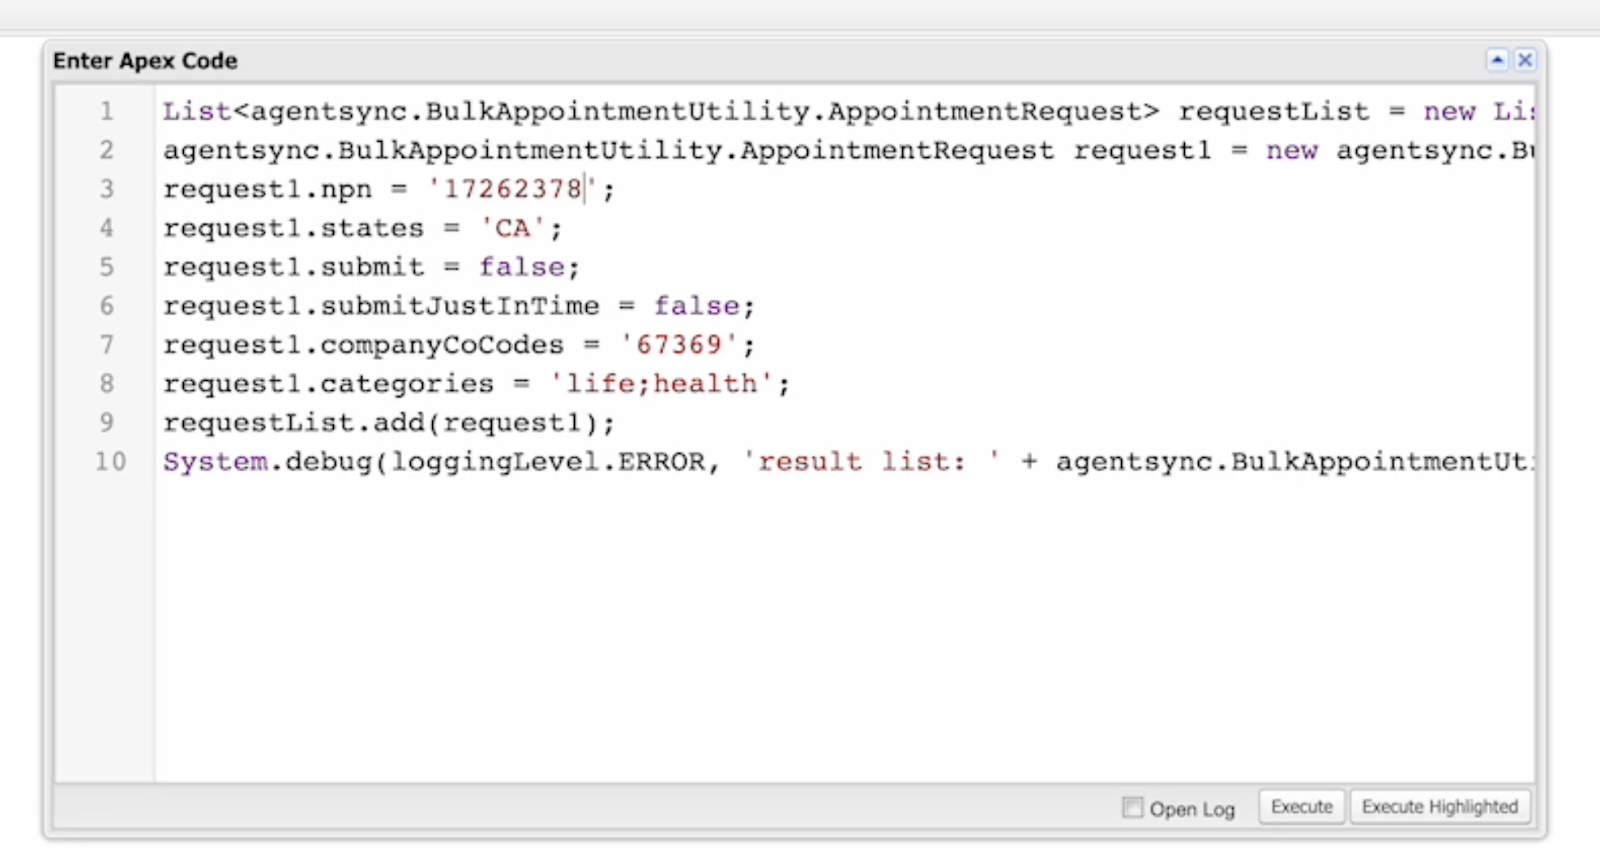
The Apex code spun up four transactions, which you can see below. This is because California has four different lines of authority that fall under the life and health line of authority category:
- Life
- Accident & Health or Sickness (including Disability)
- Health and Sickness (excluding Disability)
- Part time fraternal (which holds both a life & fraternal LOA category)

Likely, producers are not eligible for an appointment with all listed lines of authority categories and a not eligible transaction message will return after submission. As shown below, the producer was not eligible for the above line of authorities because the requested company does not appoint for life and health. The user will not be charged for this not eligible transaction.
3. AgentSync’s new Bulk Appoint Utility allow for a more precise understanding of why an appointment request was rejected. To stay on top of your appointment submissions, we highly recommend you use and report on the new “eligibility reason” field on the transaction record. This ensures that you can audit your own appointments without disrupting your workflow. See the section below to learn what the various eligibility reasons mean in AgentSync Manage.
4. AgentSync’s bulk appointment functionality only accepts our supported lines. If you are auto-submitting an appointment with one of our supported lines that does not fall under this category (ex: not_applicable), simply input the line of authority that you sell for and AgentSync’s backend code will automatically recategorize the line of authority.
5. Your company record lists the lines of authorities that their companies support. If you are getting error messages regarding not supporting certain lines of authorities, please check that your company record lists that line of authority. These records are not updated by NIPR and you must ensure that you make any updates when you expand business to new states or lines of authorities.Bulk Appoint Eligibility Reasons Dictionary
Below is a list of what each Eligibility Reason is and what it means
| Eligibility Reason | Meaning |
| Transaction creationed with Eligibility Reason = Required License Not Active (Found) and Transaction Status = Not Eligible | Either this means that the producer's license is inactive, expired, or does not exist for the requested appointment state or the license does not hold any of the requested LOA categories. |
| For Transactions where LOAs exist on the license: Eligibility Reason = In Good Standing and Transaction Status = Ready to Submit. For transactions where LOAs do not exist on license: Eligibility Reason = Required License Not Found and Transaction Status = Not Eligible | Producer does not hold the correct line of authority categories. |
| Transaction is created: Eligibility Reason = In Good Standing and Transaction Status = Ready To Submit | NPN holds more than one eligible license in requested state for agent type = producer and more than one eligible 'Ready to Submit' transaction could be created |
| Transaction created for eligble license. No transactions created for Ineligible license | All eligible transactions (Possibly multiple) will all be created for the eligible license - and for ineligible requests, transactions will still be created but in a 'Not Eligible' status with Eligibility Reason = 'Required License Not Found' |
| Transactions are created with Eligibility Teason = "No Active Resident License" and Transaction Status = Not Eligible | NPN has expired resident license or RL has Active = FALSE but license for requested state is active and not expired |
| Eligibility Reason: Required License Not Found and Transaction Status: Not Eligible | NPN does not hold license in requested state |
| Eligibility Reason: *Company Name* does not appoint in the requested State: *State* and Transaction Status = Not Eligible | Company record is missing Company State Setting for requested state |
| Eligibility Reason: Company Does Not Appoint for requested loas. TXN Status: Not Eligible | Company record is missing requested LOA categories |
| Eligibility Reason: CoCode Not Found. TXN Status: Not Eligible | Company record is missing for CoCode requested |
| All eligible appts created as JIT appt and held for submission | All eligible appts created as JIT appt and held for submission. JIT will need to =TRUE on the applicable Company State Setting records. |
| Eligibility Reasons: In Good Order. Txn Status: Dependent on NIPR response | Any request where 'submit = true' will auto submit Non-JIT PDB appointments to NIPR. Any requests with 'submitJustInTime =true' will auto-submit any JIT appts to NIPR. |
| Dependent on NIPR response. All eligible transactions are submitted to NIPR | Non-JIT state and Auto-Submit = True |
| Dependent on Eligibility Reason not related to PA | This error occurs when states license for the same class code but only appoint individuals or if Appointment Producer Assignment Required checkbox is turned on and the submitted transaction was outside of the producer assignment. |
| Two separate transaction batches should be created | This can happen when two separate requests were submitted for the same producer in the same state but the cocodes are different. |
| One transaction and one transaction batch are created | If Appointment Producer Assignment Required checkbox is turned on, then all bulk appointment requests outside of the producer assignment will be rejected. |
Still need help? Reach out to support@agentsync.io for assistance.
Bulk Terminate Appointments
Need to terminate a large number of appointments? This section will walk you through how to terminate appointments in bulk in AgentSync Manage.
Step 1: Before we can terminate, we must export the appointment data from Manage that we need. Navigate to the Reports tab in the top ribbon of your screen (check the More button on the right side if its missing)
AgentSync Tip: Using a report ensures the data in your file matches the data in Manage exactly, but you can also manually fill in a CSV Template. To download it, click here.
Step 2: Click New Report in the top right corner
Step 3: There is a list of Categories that defaults to Recently Used. Select All and type Producer Licensing with Carrier Appointments.
Step 4: Click Producer Licensing with Carrier Appointments and Start Report
Step 5: Remove Producer Licensing: Producer Licensing Name and Carrier Appointment: Carrier Appointment from the Columns by clicking X next to each line
Step 6: In the Add column... box, add the following columns in this exact order from the Carrier Appointment: info section (NOT Producer Licensing: info):
- Related Producer
- NPN
- State Code
- Line of Authority
- CoCode
Step 7: Click over to the Filters tab
Step 8: Change the Show Me filter from My producer licensing to All producer licensing and click Apply
Step 9: In the Add filters... box, add the following filters to your report:
- Cocode - equals - (your company Cocode)
- Status - equals - Appointed
- Line of Authority - equals - (the LOAs you wish to terminate)
- State Code - equals - (the states you wish to terminate)
AgentSync Tip: Not sure what your CoCode is? Click here to learn how to navigate to your Company record to find it.
Step 10: Click Run in the top right corner.
AgentSync Tip: If you want to learn how to save a report (and other reporting functionality), click here to learn more!
Step 11: In the top right corner of your report, click the down arrow next to Edit
Step 12: Click Export
Step 13: Ensure Details Only is selected, change the Format to Comma Delimited .csv and click Export
Step 14: Open the CSV file and save it to your computer.
AgentSync Tip: You can add multiple states for multiple appointments as long as the states are split by a semicolon and no space.
Step 15: Return to Manage and click 9-dotted box in the top left corner
Step 16: In the search bar, type AgentSync CSV Import and click AgentSync CSV Import under the Items category
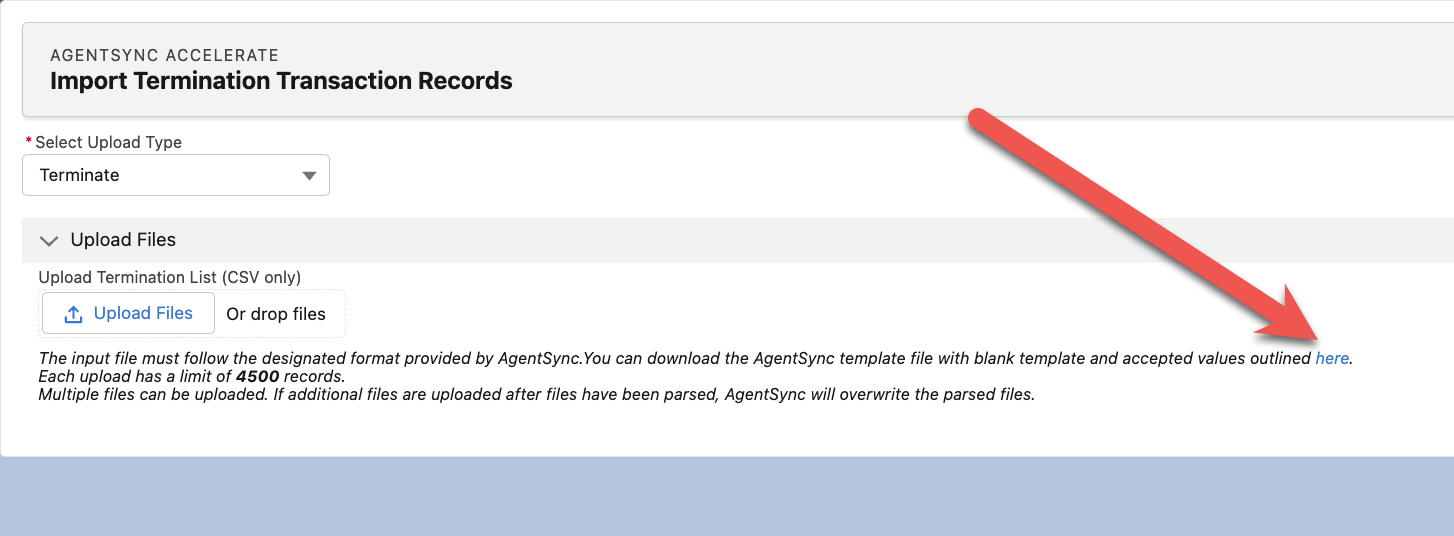
Step 17: In the Select Upload Type drop down, select Terminate
Step 18: Click the blue here link in the description to download the CSV template that must be used for the upload.
Step 19: From the exported report, copy the Agent NPN, State(s), Line of Authority and Carrier CoCode onto the exported template.
Step 20: Enter in the Termination Reason Code that aligns with each producer's appointment. You can find the Termination Reason Codes listed on the termination_reason_key tab of the template.
AgentSync Tip: Not all states accept all termination reasons. Keep this in mind as you are creating your termination spreadsheet for upload. Unsure what termination reasons each state accepts? Check out our Compliance Library for a state-by-state reference.
AgentSync Tip: You can set up default Termination Reason Codes and use those default reasons by leaving the Termination_Reason column blank! To set up default codes by state, reach out to support@agentsync.io.
Step 21: Delete the tabs labeled accepted_values and termination_reason_key from the template.
Step 22: Save the template as a CSV file
Step 23: Return to the AgentSync CSV Import tool in Manage
Step 24: Click the Upload Files button on the Import page and upload your CSV
Step 25: Click Parse 1 file
AgentSync Tip: You may see a page that looks scary saying that your document has tons of errors. It is likely because the uploader is reading the blank rows. If the errors are related to blank rows, simply minimize the rows with errors screen.
Step 26: Click Submit "x" Transactions. You can submit your transactions immediately, or create multiple batches. Creating multiple batches allows for secondary review before submission.
AgentSync Tip: The default setting is to not submit to NIPR immediately. To submit immediately, click the Immediately Submit to NIPR before pressing the Submit Transactions button.
Are you terminating the producers? If so, check out this article that walks through all offboarding steps!
Have questions? Let us know at support@agentsync.io!
Bulk Invite Agents to the Portal
Onboarding a new hire class? You can invite multiple producers to your AgentSync portal at once!
Want to learn more about Portals? Click here to read more!
Step 1: Click the Contacts tab in AgentSync Manage
Step 2: Select the producers that you would like to invite to the portal by selecting the box next to their name
AgentSync Tip: Don't see the contacts you're looking for? Salesforce defaults to your most recently viewed contacts. You can edit the view by clicking the arrow next to Recently Viewed
Step 3: Click Create/Update Portal User
Step 4: Select the portal you would like to invite your producer to from the drop down
Step 5: Click Save
Your producers are now invited to the portal! They will receive an email with instructions on how to register for the portal.
Any errors will be included in the box where you select the portal. Here are a few common errors:
- Your contact does not have an associated account
- Your contact does not have an associated email
- You no longer have portal seats. If that is the case, email support@agentsync.io to order more seats.
Still need assistance? Here is a step by step tutorial!
Here's an interactive tutorial
** Best experienced in Full Screen (click the icon in the top right corner before you begin) **